I LOVE GEMSTONES.
 |
| Amethyst geode |
I have been collecting semiprecious gemstones for ages. During my teenage years, I have been using gemstones in my Crystal Practice. I usually use clear Quartz crystals or Amethyst geodes to aid me in my studies. It was a fad in the 80's you see. Whenever I was studying or reviewing for an exam, I would place a crystal point, sometimes a geode beside me to increase my concentration. After studying, I place the crystal or geode under my pillow before I go to sleep. Does it sound weird? I think so, too. But let me tell you, modesty aside, I graduated Valedictorian in High School, got a National State Scholarship Program grant, and received a scholastic achievement medal in College. I am not endorsing Crystal Practice or New Age principles here. Apart from the "metaphysical" values of gemstones, their beauty is what has really drawn me to them in the first place. For years now, I have been designing artisan jewellery, simple projects that I undertake in my spare time. You will not believe the immense pleasure I derive from the finished products. As such, I wish to share them with you… my love and fascination for original and gorgeous semiprecious gemstone artisan jewellery.
 |
| Quartz crystal point |
ORIGINAL ARTISAN JEWELLERY.
You must love gemstones and artisan jewellery since you are still reading this. Well, then I will teach you how to make a simple artisan jewellery. It's nice to own something you made yourself, isn't it? It is also a great gift for your friends and family. A personalized gift indeed, is a treasure to keep.
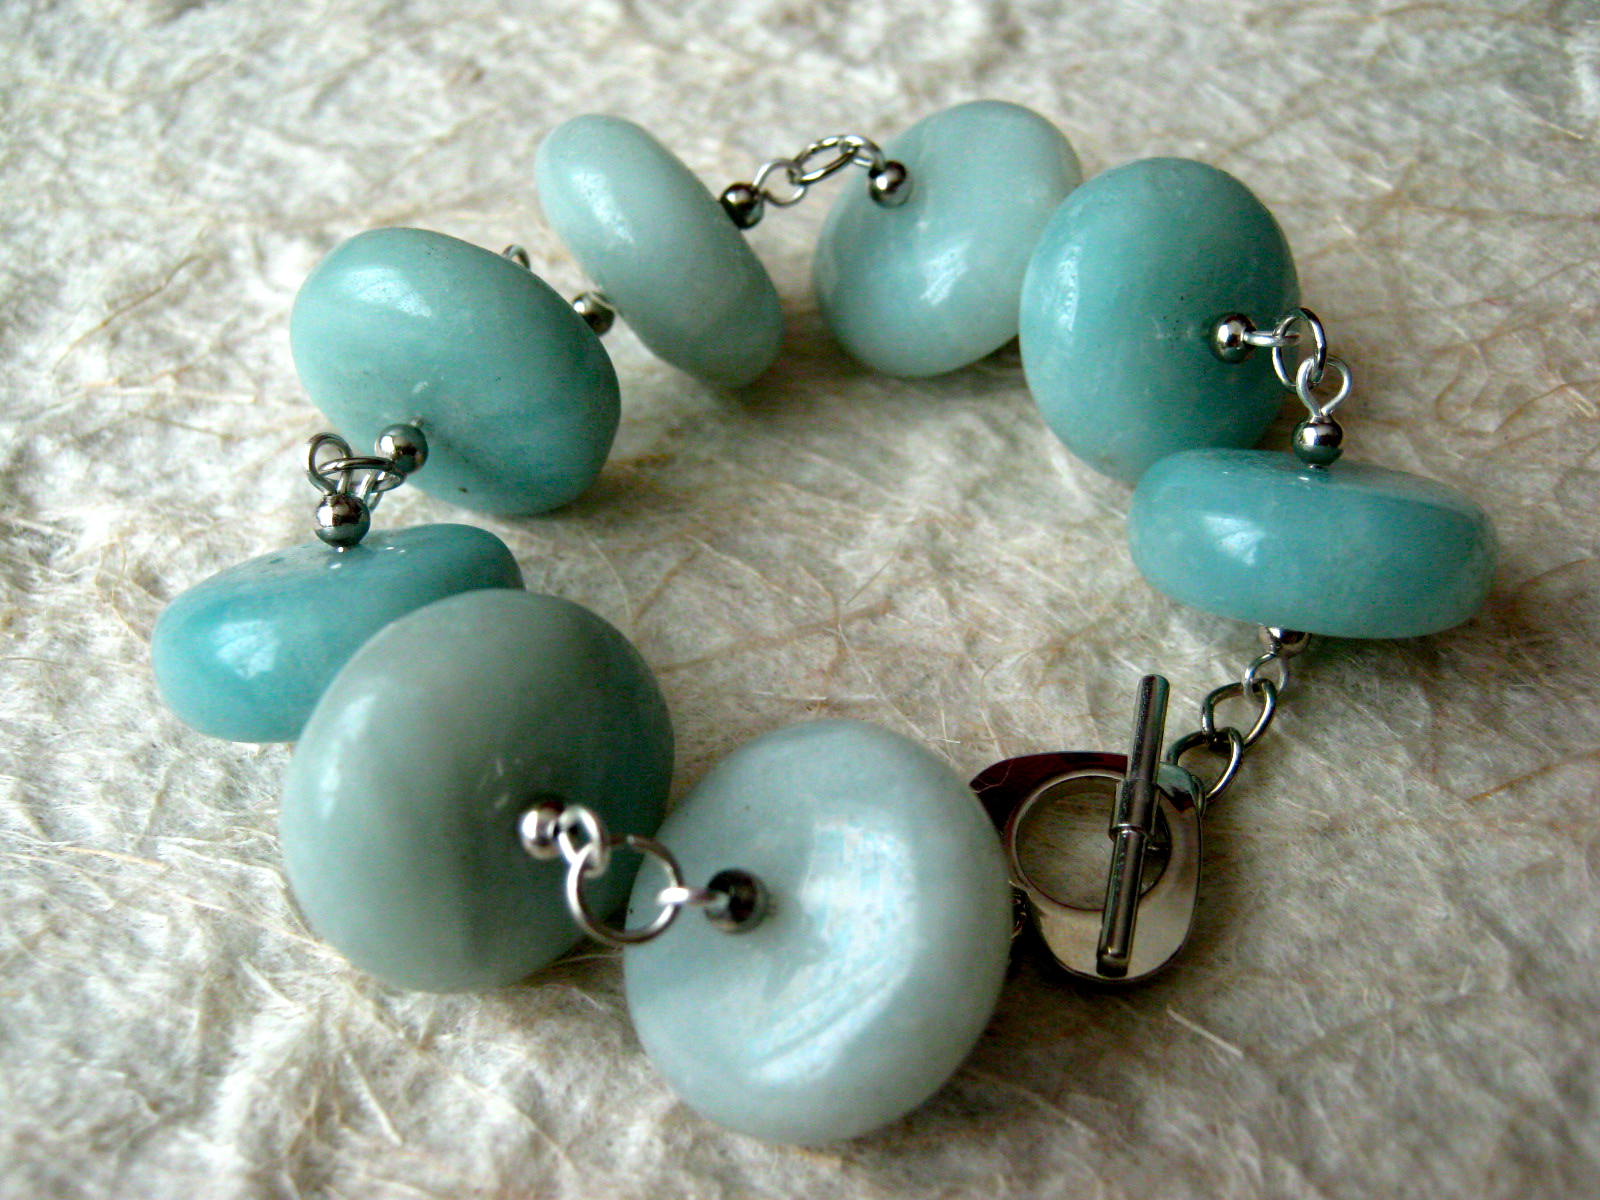
The simple but elegant Amazonite bracelet you see in the picture below is actually easy to make. I will teach you the basics plus some tips so you can design and create your own "original" bracelets after this. Follow the steps and you'll be fine. If you have questions, you can ask me anytime. Just post your comments here.
So, let's get started?
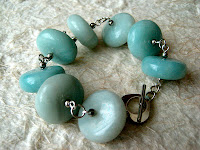 |
| originally designed Amazonite bracelet |
FIRST THINGS FIRST.
Find a store where you can source your tools and materials. The bracelet is composed of Amazonite button beads. Amazonite belongs to the Microcline family of gemstones. It is called Amazonite probably because of its gorgeous bluish green color that resemble the rainforests or the river in the Amazon. The gemstone is fairly popular and readily available in most jewelry stores or places that sell raw materials for jewelry-making. The Internet is of course a great place to source your tools and materials. Try surfing the web for great on-line stores of semiprecious gemstone beads, and jewelry-making tools and materials.
TOOLS OF THE TRADE.
Buy top quality tools. Whether you intend to create artisan jewelry as a hobby or for profit, it is best to have high quality tools that makes way more sense in the long run. You will need the following tools for this project:
 |
| cutter and pliers |
1. wire cutter - for cutting metal findings specifically pins and wires;
2. flat long-nosed pliers - essential for grips; and
3. rounded long-nosed pliers - for making eyes in pins and wires.
These tools cost about 4 to 5 U.S. Dollars. There are cheaper brands but I recommend that you get the best tools you can afford.
MATERIALS.
For this simple bracelet, prepare the following materials. You might want to add some more of the eye pins and jump rings, just in case you make mistakes:
1. 8 pieces of Amazonite button beads
2. 16 pieces of metal beads
3. 8 pieces of eye pins
4. 9 pieces of jump rings
5. 1 pair of toggle lock
You can use any semiprecious gemstone as substitute if Amazonite beads are not available. Very common and easily sourced are gemstones of the quartz family. This includes rose quartz (the pink variety), amethyst (the purple variety), citrine (the yellow variety), smoky quartz (the brown-black variety), and clear quartz (the regular colorless variety).
 |
| materials |
You have to determine the number of beads you will need. This is done by calculation. Regular wrist size is 18 centimeters or 7 inches. So, just divide this length by the size of the bead. Sometimes, it's more fun to just connect the components and just determine the right length of the bracelet along the way. If the length of the bracelet you are working on reached close to your desired length, then it's time to stop.
Metal findings are those components of the jewelry that are made of metal. This include pins, wires, jump rings, locks, toggles, spacers, etc.. We won't be using precious metals (silver, gold, platinum) for your first project. Instead, buy those cheap nickel-plated pewter metal findings. They are one of the most common materials in fashion jewelry. Pewter is a metal alloy that is mostly composed of tin and a little bit of copper. The alloy is malleable and easy to work with. Take note of the nickel-plating. There are some people although very, very few, who are allergic to nickel. You can use rhodium-plated metal findings instead. But I think there are still some people who are allergic to rhodium. So, just make sure that the person who will wear the bracelet is not allergic to the metal and plating you used. You can opt to use gold-plated metal findings but this really depends on your budget. My favorite is sterling silver. Hypoallergenic metals such as stainless steel are also available. I do not recommend stainless steel for beginners since stainless steel requires special tools due to its hardness. So, we will stick with nickel-plated pewter metal findings.
Once the tools and materials are prepared, we can now make the bracelet. Are you ready?
 |
| procedure board |
DIY STEP BY STEP.
Do it yourself! Follow the procedure below:
1. get a piece of the eye pin and string together one metal bead, an Amazonite button bead, and another metal bead as shown in the first picture on the procedure board;
2. make a loop from the straight end of the pin. You can do this by first bending the pin at a angle of about 4 degrees. TIP: I find it easier to make the loop by bending the pin at an angle close to 90 degrees. You can bend the pin using the flat long-nosed pliers. You can use your thumb as well to do this but it's better to use the pliers for a cleaner bend;
3. using the rounded long-nosed pliers, grip the end of the pin. You will see in the third picture of the procedure board that I gripped the pin on the part of the long-nosed pliers that corresponds to the diameter of the eye of the loop that I intend to create. It will be a bit hard on your first try but you'll get better with practice. This now constitute a main component of the bracelet;
4. do the 3 steps above for the rest of the 7 pieces of the Amazonite button beads. All in all you will have to create 8 components for the bracelet;
5. get a jump ring and open it so we can link the components together. To do this, use the 2 long-nosed pliers and grip the ring on 2 sides. TIP: In opening a jump ring, do not pull the sides away from each other. This will destroy the jump ring. Instead, twist the ring. Doing so will not affect the shape of the ring and it will be easier to close the ring back;
6. join two components together through the opened jump ring. Close the ring by twisting the open ring back to its original position and shape. Link all the 8 components using the jump rings;
7. attach the toggle lock to the linked components. Open a ring and insert the female part of the toggle. Do this at one end of the now linked components. Open another ring and insert the male part of the toggle and join it with the other end of the now linked components.
VOILA! You now have a semiprecious gemstone artisan jewellery. Enjoy!